Configuring your PSP for Networking
The PSP is the first portable game system with built-in wireless networking
capabilities for gaming with many people (instead of just
one-to-one like many handhelds) and a full TCP stack for access to
the Internet. The PSP is the only handheld game system ever made that
enables more than two players to play a game, just like regular console systems!
Although there are no commercial Web browsers or other Internet
applications available yet, we will be going over how to get around that little
issue in Chapter 6, “The Web on Your PSP.” In this chapter, we’ll go over
how to get the wireless access configured properly and how to extend your
wireless range so you can play with friends from far away and browse the
Net from a little further down the street.
infrared transceiver, a notable missing wireless topology is
Bluetooth. Bluetooth could have enabled many wireless keyboards
and mice to work with the system, which would have
been nice. Of course, Sony could have something up its sleeve.
Setting up the PSP to get on the Internet via Wi-Fi is fairly easy. Let’s go
through those steps now.
Turning Wireless On and Off
To enable and disable the built-in wireless of your PSP, simply flip the
switch on its left side. Up enables wireless and down disables it. This doesn’t
turn wireless on, however. Games and applications selectively turn the wireless
feature on and off, so you can safely leave the switch up and it will only
actually be “on” when an application needs it.
The PSP’s networking capabilities are very similar to a Macintosh’s, where you can set up different
network profiles for use in different locations. This will be very helpful in Chapter 6,
“The Web on Your PSP,” which presents a profile for regular use, and then one specifically for
your “hacked” network.
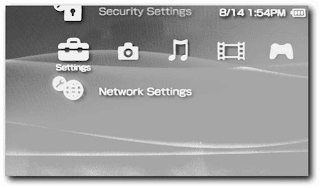
To set up a network profile, go to the PSP Navigator, select Settings, and then select Network
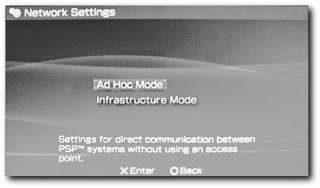
Settings . You are given two options, both of which pertain only to wireless
networking—Ad Hoc Mode and Infrastructure Mode . If you’re not familiar
with the difference between the two, read the sidebar “Wireless Modes in Focus: Ad Hoc and
Infrastructure.” Ad Hoc Mode is generally used when playing head-to-head with multiple
PSPs in close proximity (10–20 feet), as it doesn’t require a base station. Infrastructure is useful
when there are multiple people in different rooms and you use a central base station to connect.
networks, there is no central access point—all devices communicate with each other directly
instead of having an access point to run all communications through. With an Ad Hoc network,
there is no guarantee that all devices can see each other, because their “vision” is limited to
whatever devices they can receive receptions for (or “hear”).
Infrastructure networks, on the other hand, are the most common type of wireless network connection.
Utilizing a central base station, called a wireless access point, all devices connect to the
access point, then relay all their interdevice communications through the single device. Each
device connects to the base station based on its SSID, or service-station ID, which is the name
you see when you try to “join” a wireless network. Most home networks have infrastructure
networks to connect out to the Internet and to communicate wirelessly with both wireless and
wired devices.
Most of the time you are involved with multiplayer games you will be using Ad Hoc networks.
However, when you’re browsing th
 e Internet on your PSP you will usually be using an
Infrastructure connection.

networks get more and more crowded, the devices’ transmissions adversely affect the overall
available bandwidth and you could lose data and therefore have poor gameplay. Remember,
when you’re on an 11 Mbps wireless network, you’re sharing that bandwidth with everybody
else, so the more you do on the network, the less bandwidth that’s available for others. This is
especially true if you’re trying to play a PSP game with eight people while someone’s downloading
a huge file and printing a large document over your wireless network—there’s a good possibility
of losing packets and having issues with gaming.
Let’s go through configuration of both network types. Some games may actually require one
type over another—the back of the box says “Wi-Fi Compatible (Ad Hoc/Infrastructure),” Some games may not support wireless play at all and won’t have the Wi-
Fi Compatible logo on their box at all.
If you’re just going to do some quick gaming with friends, you all need to have the same network
name, or SSID, so you can all connect with each other. Once everyone has the same profile,
you can all connect and play your games together.
The PSP doesn’t actually let you set your SSID in Ad Hoc Mode, so it just defaults to a generic
name beginning with PSP, followed by a number of different characters. This can vary depending
on the game you’re playing, too, as some games will set a different SSID to differentiate the
PSP hosting the game from the other PSPs in the vicinity (which may be hosting games, too).
Unfortunately, this means anyone with a PSP and the same game could potentially join in your
game (if your game supports uninvited joins), so feel free to be paranoid and check to see who’s
around you before you start a wireless match.
If you switch to Ad Hoc Mode, you will have to switch back to Infrastructure Mode at the
Network Setting menu before you can use your PSP in infrastructure mode again.
1. Use the PSP Navigator to select Settings and then Network Settings. Select the Ad Hoc
Mode option and press X
2. Set the channel to Automatic and press X.
3. Press X to save the settings.
If you’re at home and want to connect to other PSPs on your existing wireless home network
(i.e., you don’t want to set up a separate PSP network, which would be called an Ad Hoc network,
described earlier), you need to set up an Infrastructure profile.
If you switch to Infrastructure Mode, you have to switch back to Ad Hoc Mode at the Network
Settings menu before you can use your PSP in Ad Hoc Mode again.
1. Use the PSP Navigator to select Settings and then Network Settings. Select the
Infrastructure Mode option and press >.
2. Select New Connection and press >.
3. Enter a name for the connection (see the PSP manual for instructions on how to enter
text), and then press >.
4. Enter the SSID of the base station you will be using (this would likely be the same one
your computers use to connect to the Internet). If you don’t know the SSID, use the arrows
to move down to Scan and press X to choose a list of available base stations from a list.
them. However, if you or the network administrator for the wireless network has disabled SSID
broadcasting, you will likely be forced to enter the SSID. Use a program like NetStumbler (search
on Google for it) to detect wireless networks in the area and you can get around this problem
(but you’ll have to have a wireless-enabled PC to run the application).
5. If your network has a WEP network key, move down with the arrow pad and enter your
WEP key, or leave it as None. Then press >
to enter a custom IP address, gateway address, and/or DNS server address, select
Custom. Then press >.
7. Press > to save your settings.
8. You can optionally test your settings here as well. Your new connection will appear in the
list of available networks to use next time you are in a game that supports infrastructure
mode.
To save battery life, the PSP defaults to a “wireless power saving” mode, which lowers the
transmit and receive speed of the built-in wireless.To improve wireless performance, especially
for Internet access, you should turn that mode off. Of course, it will eat more battery power,
but play around with it and see what you think.
You may actually need to disable the wireless power saving mode, as some wireless access points
and devices aren’t compatible with the power saving feature of the PSP, so knowing how to do
this may help you when you can’t connect in certain places.
Follow these steps to disable wireless power saving mode:
1. Use the PSP Navigator to select Settings, and then Power Settings.
2. Select the WLAN Power Save option and press X to select it (see Figure 5-5).
3. Set the option to Off and press X again.

Many people wonder what the heck the 802.11a, b, and g stand for. The IEEE (Institute of
Electrical and Electronics Engineers), the same people who brought your IEEE-1394 (also called
FireWire, iLink, and so forth) is an established standards body that has defined many technologies
via its internal open working groups (WGs). 802.11 is named this due to its IEEE working
group being group 802.11. IEEE Project 802 is also called the LAN/MAN Standards Committee,
or LMSC, and the 802.11 working group handles wireless LANs. Tens of millions of IEEE 802.11
devices have been deployed worldwide and are interoperable.
IEEE 802.11 has many flavors. The most widespread today is 802.11b (named after IEEE 802.11
working group B), which operates in the unlicensed ISM (Industrial, Scientific, and Medical)
band at approximately 2.45 GHz, and can transmit up to 11 Mbps. Newly available 802.11
flavors include 802.11a and 802.11g. 802.11a and g support speeds up to 54 Mbps (in the
standard, proprietary solutions claim faster speeds), and operate in the ISM band, as well as
the newly unlicensed U-NII (Unlicensed National Information Infrastructure) band, at 5.2 and
5.8 GHz.
Even though 802.11 is a standard, its availability is restricted in different regions of the world
because of varying regulations. Generally, 802.11b in the United States has 13 broadcast channels
available for use (3 optimal ones because they are non-overlapping), and 802.11a in the
United States supports 140 channels, with 12 non-overlapping optimal channels. However, in
France and Spain, the various channels available to 802.11b and g users are severely limited
(1 non-overlapping channel), while there are actually more channels available in Japan
(13 channels, 3 non-overlapping). Take note: Even though 802.11a provides so many optimal
channels, the international legalization of its 5.2 GHz frequency use has not been standardized,
so outside-U.S. deployments may run into broadcast legal issues. Another note: The 5.2 GHz
U-NII spectrum is also used by microwave landing systems to help planes land in bad weather.


0 comments:
Post a Comment