Your Ad Here
Showing posts with label PSP Tips. Show all posts

Sunday, July 19, 2009

How to Install ISO/CSO Games in PSP 3000 or PSP 2000 Latest Motherboard

Now, a lot of people have emailed or contacted me on this when it comes to PSP 3000. So, as for beginners I will teach you guys the way to install it. The advance PSP 3000 users doesn't need to read this....

Ok, usually installing ISO/CSO Games if the PSP 3000 has already the CFW Loader Installed or the 5.03 CFW GEN-A Installed in the unit. If the they are not installed, the PSP Unit will not be able to identify or find it in the PSP 3000 Memory Stick (GAMES>MEMORY STICK). Click here for CFW Enabler Guide. Or Click Here for GEN-A CFW Loader Guide

*Note: I advise you guys to buy the games first before creating an ISO backed up games. Let's also support the developers for this.


1) Now if you have an ISO game in your PC, connect your PSP 3000 to PC first.

2) Your computer should detect your PSP Memory Stick and automatically open the Memory Stick Drive. If it doesn't you can go to "My Computer" and open your Memory Stick Drive(removable disk "example F:").

3) Once you are inside, you should see lots of folders; PSP, PICTURES, VIDEO, MUSIC, etc.

4) If you don't see any folder named "ISO" from what you are seeing now, then that means you have to create one. the example should be like this: "F:\ISO\"

5) Now, lets say you have Monster Hunter Freedom Unite ISO with you. All you have to do is copy "MHFU.iso"and paste it into "F:\ISO\". The example should be like this: "F:\ISO\MHFU.iso"

6) Now after that, just disconnect your PSP and go to GAMES>MEMORY STICK>Monster Hunter Freedom Unite. That's it!! :)

*Note: Make sure that you have 5.03 ChickHEN R2 running in your PSP 3000 along with the CFW LOADER. To make this work.

Now others may ask or search

Q: How do you uninstall the program ChickHEN R2 and the CFW Enabler or GEN-A LOADER?

A: Simple, just shutdown the psp unit completely. As in HOLD Turn Off long enough to make it shutdown. After that, switch the PSP Unit back on and the version of the PSP Unit should go back to Official Firmware 5.03.

Q: I've seen some people manage to install a Customed Theme to PSP 3000, how can i install that one?

A: You can if you want, but my suggestion to you guys is NOT TO INSTALL them. There is a chance to brick your PSP 3000.

SOurce : http://mpsp.blogspot.com

Friday, September 5, 2008

Accessing Intant Messanger in Your PSP

Sites Optimized for Mobile Devices
Many Web sites have versions of their content optimized for mobile devices. These optimized
pages lack the extranneous graphics and scripts and just show the images and text you need,
ideal for a device like the PSP, which doesn’t have a lot of RAM or screen real estate to display
all the images, ads, and so forth on pages. If you can find a mobile version of the site you want
to browse, use it—you’ll find browsing the site is much more responsive, and you’ll spend less
of your PSP’s processor and battery life rendering pages because you can leave the wireless
power-saving option on.
AOL Instant Messenger
Even thought America Online is not likely to release a PSP Instant Messenger version of AOL
soon, you don’t have to be without your buddy list. Using your PSP’s Web browser you can log
on to WebAIM at www.webaim.net, type your username and password, and access your
buddy list, send and receive instant messages, and more
in action in a regular PC browser).WebAIM even has a login page made especially for PSPs,
with an on-screen keyboard to save you time entering your username and password—just head
over to http://dev.webaim.net/psplogin.jsp.


WebAIM in action in Firefox

WebAIM in action on my PSP using Sony’s Web browser, which is enabled
in the Firmware 2.0 update. Of course, you can still use the Wipeout Pure Web browser hack
from Chapter 6, “The Web on Your PSP,” so you don’t have to upgrade to Firmware 2.0 and
lose the ability to program your PSP and run homebrew applications.


WebAIM in action on the PSP
WebAIM’s free servers are often pretty crowded, so getting one can take a while. I opted to pay
for their premium service, which guarantees me access any time of the day, for around $4 per
month or a scant $17 for six months.
Accessing Most of the Messenger Services for Free
Instead of using WebAIM, you can also use the free service Meebo, available
www.meebo.com. Meebo lets you access your AOL Instant Messenger (AIM), MSN
Messenger, Yahoo Messenger, and Jabber (Google Talk uses Jabber) accounts from a single
interface.Try it out on your PSP.

Thursday, September 4, 2008

Accessing E-mail and Webmail in your PSP

The number one use for the Internet is accessing e-mail. The PSP does not ship with a mail
client, and rightly so—it would have to store its messages on the Memory Stick, which is
expensive storage, and there’s no keyboard. However, the PSP is an ideal reader for many types of media, including e-mail, so all you need is a Web browser, the right Web site to retrieve your
e-mail, and a Wi-Fi connection.
If your Web mail server requires a certain port to be used, such as http://mail
.servername.com:8383, you have to enter the http:// as well as the :8383. If you don’t
enter the http://, the PSP’s Web browsers will usually time out (this is a bug in Sony’s software,
it’s not your server).
If you already have Web mail access, go ahead and use that. Most Web mail programs should
work fine with any of the PSP Web browsers (including Microsoft Exchange Webmail).
However, if you don’t already have Webmail access, you don’t have to go get your own server or
kidnap a hacker. Simply point your browser to https://mail2web.com/. Mail2Web is a
free service that enables you to enter your e-mail address and password and send and receive
mail from anywhere with just your PSP and an Internet connection.
If you want to use your cell phone with Mail2Web, go to
http://mail2web.com/wap.


Accessing e-mail on the PSP with Mail2Web

Sony PSP Web Browser Tips
Here are a few tips to save you a lot of time when using the official Sony PSP Web browser
that shipped starting with PSP Firmware 2.0:
 Use the Bookmark feature, which is the same as Internet Explorer’s Favorites feature. It
saves you a lot of typing.To access the bookmarks feature, press ^ to access the Web
browser menu, and then go to the picture of the heart and press x. Press x on
Bookmarks.To add a bookmark, navigate to the page you want to bookmark, and then
go to your bookmarks and select Add to Bookmarks.
If you use the bookmarks feature of Sony’s Web browser, a Memory Stick must be inserted for
the PSP to save the bookmarks file.

 When you need to scroll around a page, hold downd square button then use the analog (round)
stick to scroll the page up, down, left. and right.
 If you often visit the same site first, such as your Webmail, RSS feeds, search engine, and
so forth, make it your default home page.To set your default home page, press ^ to
open the Web browser menu, and then scroll over to the toolbox icon, and press x.
Select Settings and press x. Then select Home Page Settings and press x. Enter
the home page you would like to use, and then press x to save it. Now whenever you
press x on the Home icon in the PSP menu, you are taken to the Web site you just
entered.
 If you have to use a proxy server on your network, press ^ to open the Web browser
menu, and then scroll over to the toolbox icon and press x . Select Settings and
press x . Then select Proxy Server Settings and press x . Enter your proxy information
and you should be able to browse the Web. Unfortunately, Sony’s Web browser
doesn’t support profiles, so if you switch networks, you will have to remove and re-enter
proxy information as needed.

Configuring your PSP for Networking

The PSP is the first portable game system with built-in wireless networking
capabilities for gaming with many people (instead of just
one-to-one like many handhelds) and a full TCP stack for access to
the Internet. The PSP is the only handheld game system ever made that
enables more than two players to play a game, just like regular console systems!
Although there are no commercial Web browsers or other Internet
applications available yet, we will be going over how to get around that little
issue in Chapter 6, “The Web on Your PSP.” In this chapter, we’ll go over
how to get the wireless access configured properly and how to extend your
wireless range so you can play with friends from far away and browse the
Net from a little further down the street.

While the PSP has wireless out the wazoo with its 802.11b and
infrared transceiver, a notable missing wireless topology is
Bluetooth. Bluetooth could have enabled many wireless keyboards
and mice to work with the system, which would have
been nice. Of course, Sony could have something up its sleeve.

Configuring Wireless Internet Access
Setting up the PSP to get on the Internet via Wi-Fi is fairly easy. Let’s go
through those steps now.
Turning Wireless On and Off
To enable and disable the built-in wireless of your PSP, simply flip the
switch on its left side. Up enables wireless and down disables it. This doesn’t
turn wireless on, however. Games and applications selectively turn the wireless
feature on and off, so you can safely leave the switch up and it will only
actually be “on” when an application needs it.

You can tell if your wireless is being used when the wireless access light is flickering


The wireless access light on the PSP

Set Up a Networking Profile
The PSP’s networking capabilities are very similar to a Macintosh’s, where you can set up different
network profiles for use in different locations. This will be very helpful in Chapter 6,
“The Web on Your PSP,” which presents a profile for regular use, and then one specifically for
your “hacked” network.
To set up a network profile, go to the PSP Navigator, select Settings, and then select Network
Settings . You are given two options, both of which pertain only to wireless
networking—Ad Hoc Mode and Infrastructure Mode . If you’re not familiar
with the difference between the two, read the sidebar “Wireless Modes in Focus: Ad Hoc and
Infrastructure.” Ad Hoc Mode is generally used when playing head-to-head with multiple
PSPs in close proximity (10–20 feet), as it doesn’t require a base station. Infrastructure is useful
when there are multiple people in different rooms and you use a central base station to connect.

There are two types of connections in wireless networks: Ad Hoc and Infrastructure. In Ad Hoc
networks, there is no central access point—all devices communicate with each other directly
instead of having an access point to run all communications through. With an Ad Hoc network,
there is no guarantee that all devices can see each other, because their “vision” is limited to
whatever devices they can receive receptions for (or “hear”).
Infrastructure networks, on the other hand, are the most common type of wireless network connection.
Utilizing a central base station, called a wireless access point, all devices connect to the
access point, then relay all their interdevice communications through the single device. Each
device connects to the base station based on its SSID, or service-station ID, which is the name
you see when you try to “join” a wireless network. Most home networks have infrastructure
networks to connect out to the Internet and to communicate wirelessly with both wireless and
wired devices.
Most of the time you are involved with multiplayer games you will be using Ad Hoc networks.
However, when you’re browsing th
e Internet on your PSP you will usually be using an
Infrastructure connection.


The Network Settings option in the PSP Navigator


The wireless network mode selector under the PSP Network Settings option

It’s actually a good thing that most PSP games limit wireless play to eight players. As wireless
networks get more and more crowded, the devices’ transmissions adversely affect the overall
available bandwidth and you could lose data and therefore have poor gameplay. Remember,
when you’re on an 11 Mbps wireless network, you’re sharing that bandwidth with everybody
else, so the more you do on the network, the less bandwidth that’s available for others. This is
especially true if you’re trying to play a PSP game with eight people while someone’s downloading
a huge file and printing a large document over your wireless network—there’s a good possibility
of losing packets and having issues with gaming.
Let’s go through configuration of both network types. Some games may actually require one
type over another—the back of the box says “Wi-Fi Compatible (Ad Hoc/Infrastructure),” Some games may not support wireless play at all and won’t have the Wi-
Fi Compatible logo on their box at all.

Creating an Ad-Hoc Wireless Profile
If you’re just going to do some quick gaming with friends, you all need to have the same network
name, or SSID, so you can all connect with each other. Once everyone has the same profile,
you can all connect and play your games together.
The PSP doesn’t actually let you set your SSID in Ad Hoc Mode, so it just defaults to a generic
name beginning with PSP, followed by a number of different characters. This can vary depending
on the game you’re playing, too, as some games will set a different SSID to differentiate the
PSP hosting the game from the other PSPs in the vicinity (which may be hosting games, too).
Unfortunately, this means anyone with a PSP and the same game could potentially join in your
game (if your game supports uninvited joins), so feel free to be paranoid and check to see who’s
around you before you start a wireless match.
If you switch to Ad Hoc Mode, you will have to switch back to Infrastructure Mode at the
Network Setting menu before you can use your PSP in infrastructure mode again.

Follow these steps to set up an Ad Hoc network:
1. Use the PSP Navigator to select Settings and then Network Settings. Select the Ad Hoc
Mode option and press X
2. Set the channel to Automatic and press X.
3. Press X to save the settings.

Creating an Infrastructure Wireless Profile
If you’re at home and want to connect to other PSPs on your existing wireless home network
(i.e., you don’t want to set up a separate PSP network, which would be called an Ad Hoc network,
described earlier), you need to set up an Infrastructure profile.
If you switch to Infrastructure Mode, you have to switch back to Ad Hoc Mode at the Network
Settings menu before you can use your PSP in Ad Hoc Mode again.

Follow these steps to set up an Infrastructure network:
1. Use the PSP Navigator to select Settings and then Network Settings. Select the
Infrastructure Mode option and press >.
2. Select New Connection and press >.
3. Enter a name for the connection (see the PSP manual for instructions on how to enter
text), and then press >.
4. Enter the SSID of the base station you will be using (this would likely be the same one
your computers use to connect to the Internet). If you don’t know the SSID, use the arrows
to move down to Scan and press X to choose a list of available base stations from a list.

By default, many base stations broadcast the SSID so other systems can detect them and use
them. However, if you or the network administrator for the wireless network has disabled SSID
broadcasting, you will likely be forced to enter the SSID. Use a program like NetStumbler (search
on Google for it) to detect wireless networks in the area and you can get around this problem
(but you’ll have to have a wireless-enabled PC to run the application).
5. If your network has a WEP network key, move down with the arrow pad and enter your
WEP key, or leave it as None. Then press >

6. If you have a DHCP server (most wireless networks do), select Easy mode. If you want
to enter a custom IP address, gateway address, and/or DNS server address, select
Custom. Then press >.
7. Press > to save your settings.
8. You can optionally test your settings here as well. Your new connection will appear in the
list of available networks to use next time you are in a game that supports infrastructure
mode.

Speeding Up Wireless Internet Access
To save battery life, the PSP defaults to a “wireless power saving” mode, which lowers the
transmit and receive speed of the built-in wireless.To improve wireless performance, especially
for Internet access, you should turn that mode off. Of course, it will eat more battery power,
but play around with it and see what you think.
You may actually need to disable the wireless power saving mode, as some wireless access points
and devices aren’t compatible with the power saving feature of the PSP, so knowing how to do
this may help you when you can’t connect in certain places.
Follow these steps to disable wireless power saving mode:
1. Use the PSP Navigator to select Settings, and then Power Settings.
2. Select the WLAN Power Save option and press X to select it (see Figure 5-5).
3. Set the option to Off and press X again.


Disabling WLAN Power Save mode
Why Is It Called 802.11?
Many people wonder what the heck the 802.11a, b, and g stand for. The IEEE (Institute of
Electrical and Electronics Engineers), the same people who brought your IEEE-1394 (also called
FireWire, iLink, and so forth) is an established standards body that has defined many technologies
via its internal open working groups (WGs). 802.11 is named this due to its IEEE working
group being group 802.11. IEEE Project 802 is also called the LAN/MAN Standards Committee,
or LMSC, and the 802.11 working group handles wireless LANs. Tens of millions of IEEE 802.11
devices have been deployed worldwide and are interoperable.
IEEE 802.11 has many flavors. The most widespread today is 802.11b (named after IEEE 802.11
working group B), which operates in the unlicensed ISM (Industrial, Scientific, and Medical)
band at approximately 2.45 GHz, and can transmit up to 11 Mbps. Newly available 802.11
flavors include 802.11a and 802.11g. 802.11a and g support speeds up to 54 Mbps (in the
standard, proprietary solutions claim faster speeds), and operate in the ISM band, as well as
the newly unlicensed U-NII (Unlicensed National Information Infrastructure) band, at 5.2 and
5.8 GHz.
Even though 802.11 is a standard, its availability is restricted in different regions of the world
because of varying regulations. Generally, 802.11b in the United States has 13 broadcast channels
available for use (3 optimal ones because they are non-overlapping), and 802.11a in the
United States supports 140 channels, with 12 non-overlapping optimal channels. However, in
France and Spain, the various channels available to 802.11b and g users are severely limited
(1 non-overlapping channel), while there are actually more channels available in Japan
(13 channels, 3 non-overlapping). Take note: Even though 802.11a provides so many optimal
channels, the international legalization of its 5.2 GHz frequency use has not been standardized,
so outside-U.S. deployments may run into broadcast legal issues. Another note: The 5.2 GHz
U-NII spectrum is also used by microwave landing systems to help planes land in bad weather.

Opening Up Your PSP and Removing Parts

The following tells you, step-by-step, how to open up and remove the main parts of your
PSP.To put your PSP back together, just perform these steps in reverse order.

Step 1: Prepare the PSP
Be very careful working with your PSP. Just like a medical operation, you need to take precautions.
The first step is to place the PSP face down on the electrostatic mat or white towel (only
if there’s no static), and to put on your static wrist strap and ground it appropriately. Using the
mat or towel prevents scratches to the PSP’s plastic screen cover.
Remove any Memory Stick and UMD game cartridge you have loaded, and remove the battery
from your PSP.
below is a diagram of the locations of the screws on the backplane and battery compartment.
Print this diagram and when you remove a screw, place it on the diagram on a flat surface
far enough from where you’re working (and away from pets) so you don’t bump into it.
Using a little bit of two-sided tape can help as well, keeping the screws in place, but that’s generally
overkill as long as you’re careful.

Step 2: Remove the Back Plane
The PSP’s back plane (the side with the word PSP in a circle) is your doorway to the insides of
your PSP. You’re going to need to remove the battery cover to complete this step. Note that
some of the screws are covered by a sticker, which you will have to move out of the way or
remove altogether to access. However, removing that sticker likely voids your warranty, so be
prepared.
You need to remove eight screws with your Philips head screwdriver. The screw holes have a
very narrow radius, so this is where the thin shaft of the screwdriver and the magnetic tip come
into play. Make sure you don’t strip the screw heads.
Once you’ve removed all the screws (don’t leave them loose in their sockets), gently separate the
backplane from the cover. At this point the clear Left and Right triggers (marked as L and R)
may come out— that’s okay, because they rely on the case being together to stay where they
are. You can safely leave them off and just slide them back into place when you put your PSP
back together (you’ll see the grooves they slide into).
Put the faceplate away in a safe location, face-up, so you don’t scratch the plastic, and put the
PSP face-up in front of you. You should now see the guts of your PSP,
including the screen, the bottom button bar, what that slick analog stick looks like underneath,
and your arrow and shape button contacts.
If you have to put the L and R buttons back in when putting your PSP back together, make sure
they move like they did before. When they are properly in place, they will move like they’re supposed
to (like triggers). You know you’ve got it wrong if they don’t have any spring action when
you press them—in that case, just reseat them and make sure they’re in the proper grooves
on your PSP.
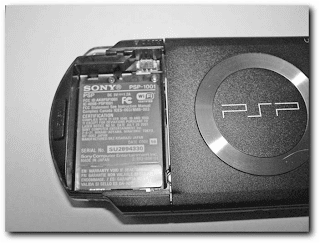


The last screw hides under a warranty-voiding sticker
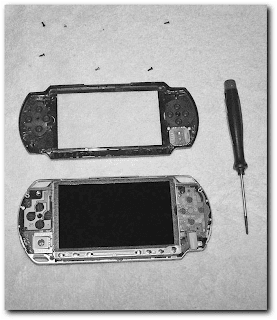


The first layer of PSP guts

Step 3: Remove the Metal Button Bar
Now that you’ve removed the faceplate and can see the guts of your system, it’s time to remove
the screen. In order to do this you’re first going to have to remove the metal button bar on the
bottom of the device
To remove the metal button bar, simply pry a little on the metal catch to left of the bar and
very gently lift it out at an angle. It is connected to the PSP’s mainboard by a circuit strip connector.
You need to very carefully move the circuit strip connector up with the flat-blade screwdriver
so you can pull the circuit strip out of its holder (the tan tab). Remember which side was
up when you pull the circuit strip out or the button bar won’t work when you put it back in.

Step 4: Remove the Screen
Now that you’ve removed the button bar, you can remove the screen. This part’s a little tricky
because you don’t want to crack the screen or bend any metal. Patience and gentleness are
virtues during this entire process—your PSP is at stake here!
On the bottom-left corner of the screen is a metal piece in between the analog stick controller
board and the display, making up part of the metal border of the screen.Wedge the thin flatblade
screwdriver into that crevice and the metal wedge should pop up and out a little bit. Do
the same on the top-left, and now you should be able to carefully wiggle the screen out. Be very
careful; do not bend the display or pry too hard or you may crack the LCD panel or irreparably
bend the metal—hence the reason for the very thin precision flat-blade screwdriver.
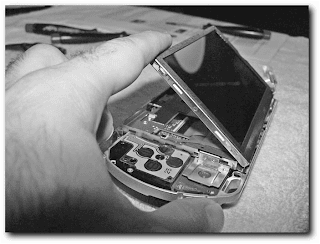


To remove the screen completely, you have to remove more circuit strips (and pay attention to
which angle you had to open their catches and which way the circuit strip goes in). The long
connector on the left lifts from the bottom, while the shorter one on the right lifts from the top
Once you have removed the screen, place it face-down on a towel to prevent scratching.
Preferably, you should put it somewhere it won’t fall onto a hard surface.

Step 5: Remove the Metal Screen Holder
Now that you removed the display, you need to remove the metal display holder so you can
access the PSP’s mainboard.To do this, you need to remove the nine remaining screws with the
precision Philips-head screwdriver. After you have removed each screw, place it in the appropriate
position on your copy of the screw location diagram. In addition to the screws, the metal
screen holder is held in place by the release switch for the UMD drive. Gently slide it to the
right to release its grip on the metal, then all you have to do is gently lift out the display holder
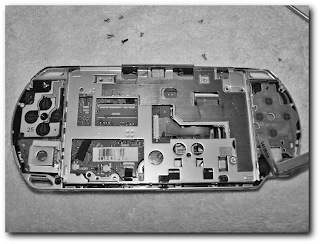


The metal screen holder with the nine screws removed

Step 6: Carefully Remove the Circuit Strips
Now that you’ve removed the screen holder, you need to get to the mainboard. You need to
remove the circuit strip connecting the UMD drive to the mainboard. Be very careful, as the first time I did this the solder was weak the circuit strip holder
actually came off the mainboard! Then remove the power plug at the top left, but not the small
ones on the bottom of the board, while continuing to be careful not to break any wires or
solder.

Once you disconnect the cables, you may still have one more step to complete depending on
how your PSP was made. You may see the black wireless antenna cable running alongside the
top of your PSP . Gently remove this from the groove it runs through on the
top left of the mainboard so you can successfully remove the mainboard.
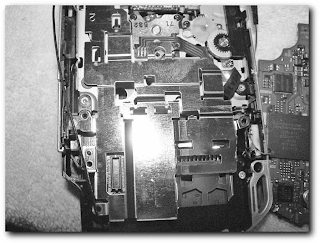


The PSP’s wireless antenna

Step 7: Remove the Mainboard
Now that the cables are out of the way, gently lift up the mainboard and put it aside. If you take a look at the mainboard, you’ll see the ARM-based processor Sony
uses, their graphics chip and USB controller, as well as many other items.
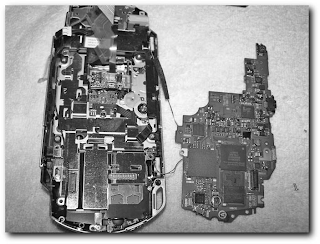


The mainboard successfully removed

All this work and you’re still not at the Wi-Fi interface yet! (I sure wish Sony had made this
easier.) To get to the final piece, the Wi-Fi card, you need to remove the shielding plate by
using your precision Philips-head to remove the three remaining screens holding it in place
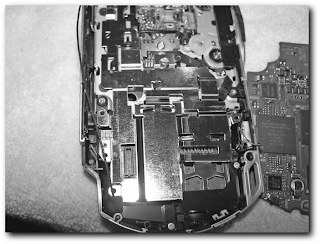


The screws holding the Wi-Fi card in place

Step 9: Remove the Wi-Fi + Memory Stick Board
Now here’s the final piece: the Wi-Fi communications board, which also houses the Memory
Stick interface, as shown in Figure 4-16. You can remove this piece if you like and see an
entirely gutted PSP, or just start putting things back together (good thing you have those screw
diagrams!) or fidgeting around. Note that the Wi-Fi board has a socket connector, making
upgrading or replacing the antenna fairly easy (well, besides the PSP disassembly step), . Appendix A has a link to an online project to add an external wireless
antenna. If you’ve come so far that you’re at the Wi-Fi + Memory Stick board, feel free to
try that project. I did not discuss it in detail in this book because most people may not take
apart their PSP so fully (there’s usually no reason other than for exploratory purposes).
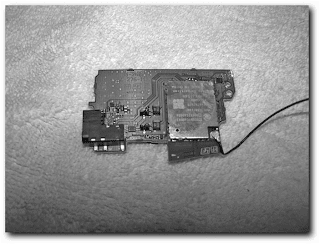

The PSP’s Wi-Fi board, Memory Stick interface, and antenna socket connector
Knowing
how the PSP ticks on the inside is important for any hardware hacks you may want to attempt,
including fixing your PSP yourself when sending it to Sony is not an option.

Saving Xbox to your PSP

This is a funny hack, considering how Sony and Microsoft are bitter rivals in the game console
market. Using the PSP’s USB connectivity, and the Xbox’s ability to recognize USB storage
devices, you can use the Memory Stick in your PSP as a game-saving tool.
Don’t worry; even though this hack formats your Memory Stick, it won’t affect your PSP’s
internals at all. You’re not risking your PSP by plugging it into an Xbox.
Here’s what you need:
 Microsoft Phantasy Star Online Keyboard Adapter or Xbox Controller USB Adapter


The Phantasy Star Online Keyboard Adapter


The Xbox Controller USB Adapter
 A Memory Stick you don’t care about, like the 32MB one that shipped with the PSP
Value Pack (it will be erased by this operation, but you can still use it again by formatting
it on the PSP)
 An appropriate USB cable (mini-USB to full-size USB)
 An Xbox and games you want to save data for
You may also need a USB gender-bender, taking the PSP connector from male to female,
which is shown in Figure 3-16. This depends on what the adapter’s USB connection looks like.
Most likely you won’t need it, but if you do you can pick it up at any CompUSA, Fry’s, Best
Buy, or other computer store.
The Phantasy Star Online Keyboard Adapter has been discontinued by Microsoft. However, if
you cannot find one online, you can still get a USB adapter that plugs into the front of your
Xbox. The only drawback to this is you have to sacrifice a controller port, so no 4-player games
if you want to save on the PSP. The Phantasy Star Online Keyboard Adapter, on the other hand,
plugs into any Xbox controller. You’re likely not saving 4-player games on your PSP, of course, so
this shouldn’t be a problem. When you’re done with the save, simply unplug the PSP. When you
need it again, just plug it back in.


A USB gender-bender


Using the PSP as an Xbox game saving device makes the Memory Stick unusable in the PSP. To
use the Memory Stick in your PSP again, you have to format it with the PSP’s format utility.


Step 1: Get to the Save Game Point in an Xbox Game
The first step is to find an Xbox game and get to the point where it will let you save a game. I
chose Halo, but you can choose whatever you want. You actually don’t have to have a game in
there—you can just use the Xbox’s configuration menu’s storage devices


Step 2: Plug Your PSP into the Xbox USB Adapter
Now that you’re ready to save your game, plug your PSP into the Xbox USB adapter using the
adapter and the USB cable.
Microsoft’s Xbox runs a modified version of the Windows 2000 operating system, and the
Xbox’s controller ports are all USB-based, so that’s why this hack works.


Connecting the Xbox adapter

Step 3: Put Your PSP in USB Connection Mode
Place your PSP in USB Connection Mode by using the PSP Navigator to open Settings, then
USB Connection. Your Xbox should detect the PSP as a memory card and display an error
message, as shown below.


The Xbox informing you it has formatted your Memory Stick for use

Step 4: Save
Press A on your Xbox controller to continue and you see your hard disk and the new Memory
Stick, ready for game saving action! below shows you what this should look like. Now,
simply save your game and you’re all set. This is quite convenient if you want to take game
saves between your friends’ houses and don’t want to plunk down the money for the Xbox
Memory Units.


The PSP shows up as a storage device on the Xbox


Changing the PSP’s Background Color

You know that background color for Navigator screens that seems to magically change every
once in a while? Well, the truth is it’s keyed on the PSP’s date settings.To change your background
color, simply change the date on your PSP, like this:
1. Go to Settings.
2. Go to Date and Time Settings.
3. Change the month in the date (see Table 3-2 for a list of colors).


Table 3-2 Month colors on the PSP
Month - Background color
January - Silver
February - Light Gold
March - Lime Green
April - Pink
May - Green
June - Periwinkle Blue
July - Sky Blue
August - Pure Blue + Sky Blue (it’s mixed)
September - Purple
October - Gold
November - Bronze
December - Red


New Background Features in Firmware 2.0

With Firmware 2.0 (a.k.a. System Update 2.0), Sony introduced the ability to change the
background color to any of the colors mentioned in Table 3-2, although it’s possible that future
firmware versions may let you choose any color. You can even set a photo to be your background,
or wallpaper, image if you have images on your Memory Stick.
To change your background color, open the PSP Navigator and select Settings, then Theme
Settings, then Theme, and set your background color by pressing X on the color of your choice.
If you change the setting back to Original, it will go back to the monthly color changing
scheme.


Changing Your Wallpaper

To set your wallpaper image, open the PSP Navigator, select Photo, and then select the image
you want as your wallpaper (background image) by pressing X on the selected image.When
the image is displayed, press TRIANGLE, and select the icon for “Set as Wallpaper” and press
X. Select Yes when your PSP asks you if you want it to set the image as the wallpaper. Then
press O when it says “Save completed” and your wallpaper is set.
To disable your wallpaper, open the PSP Navigator and select Settings, then Theme Settings,
and then Wallpaper. Change the option from Use to Do Not Use to turn off your wallpaper.
You can set it to Use to turn it back on again. After turning off your wallpaper, your background
color reappears.

Syncing the PSP with Your Computer

A number of utilities have emerged that automatically sync your PSP’s saved game data, music,
music, photos, movies, and even Web site bookmarks. These products include iPSP, PSPWare,
PSP Sync, PSP Video 9, Browser 2 PSP (I wrote that one), and a number of others. iPSP and
PSPWare are the most popular “all around syncing” utilities, while PSP Video 9 is the most
popular video conversion and sync product (plus it’s free). I cover these products in detail in
Chapter 10, “Video Hacks,” and Chapter 23, “Synchronization and Utility Software.”
You don’t have to use a program to move data from your PC to your PSP or vice versa. Using
the PSP’s built-in USB connection capability, you can back up your games, transfer music,
images, and video back and forth, and even transfer your Web bookmarks. Of course, it’s a little
more difficult because you have to do all the manual work, and the utilities I discuss do a lot of
the work for you automatically, but it’s fairly simple if you don’t want to install additional software
on your machine.


PSP Media location

Media type Location
Video MP_ROOT \ 100MNV01
Audio PSP \ MUSIC
Photos PSP \ PHOTO
Games PSP \ GAME
Saved games PSP \ SAVEDATA
Browser data PSP \ SYSTEM \ BROWSER
Shared data (usually the default PSP \ SHARED
location for Web browser downloads)

The PSP as a Storage Device

With a Memory Stick and a PSP with an appropriate USB cable, the PSP can be used
to save any sort of data file, ultimately becoming a very large “thumb” drive. The PSP ships
with USB 2.0, so transferring your movies will happen at speeds (up to) 440 Mbps (megabits
per second), and your capacity is only limited by the Memory Stick you have. If you don’t want
to carry a bunch of thumb drives, just take your PSP with you and a decent size Memory Stick
Duo and you can play games and transfer files, without carrying any extra equipment.
Here’s what you need:
 A Memory Stick in your PSP’s Memory Stick slot
 A USB to mini-USB cable
 A computer (Mac, PC, and Linux should work fine; no drivers required)


Follow these steps to turn on the USB data transfer function:
1. Plug the mini-USB end of your USB cable into your PSP and the
other end into your computer.

2. Go to Settings in Navigator.
3. Select USB Connection and press .
Your drive appears on your computer desktop.

Don’t delete any of the folders that exist on your memory card that you didn’t create yourself.
Removing those can erase your saved game data, among other settings the PSP needs on that
Memory Stick.

Sony PSP UMD, the “Universal” Media Disc

UMD, or Universal Media Disc, is the official distributed media format for the PSP. You can
use Memory Stick Duo media (and standard Memory Sticks as well, which is discussed in the
next chapter); however, most PSP games utilize UMD discs, which for the time being cannot
be copied (although it is possible to “dump” their contents to the Memory Stick using certain
utilities this book does not discuss).
UMDs are optical discs that can hold up to 1.8GB of any type of data, just like a DVD or CD.
The “official” UMD formats are UMD Game, UMD Music, and UMD Video. In addition to
game distribution houses, Sony has licensed a number of movie studios (such as Universal,
Paramount, and New Line Home Cinema) to release UMD Video titles. Sony has also discussed
submitting the format for standardization, but this seems unlikely for the near future, as
control over the recorders would become an issue due to piracy.


Piracy is likely the reason for the proprietary UMD format, plus the fact that it appears to be
based on the HiMD MiniDisc media format, a product Sony failed to bring to successful
mass-market penetration many years ago. Hackers have already figured out a way to dump the
data from a UMD to a CD or DVD, but Sony attempted to stop this type of copyright
infringement in firmware update 1.51.
Here are the specifications for the UMD media format (source:Wikipedia, http://
en.wikipedia.org/wiki/Universal_Media_Disc):
 ECMA (an international standards body) standard number ECMA-365: Data
Interchange on 60 mm Read-Only ODC (optical disc cartridge). More information on
the standard can be found at http://www.ecma-international.org/
publications/standards/Ecma-365.htm.
 Capacity: 1.8 GB (UMD)
 Dimensions: Approx. 65 mm (W) × 64 mm (D) × 4.2 mm (H)
 Diameter: 60 mm
 Maximum capacity: 1.80GB (single-sided, dual layer)
 Laser wavelength: 660 nm (red laser)
 Encryption: AES 128-bit (decryption of which is built into the PSP’s hardware)
 Conforms to ISO-9660 file format, the same as CDs and DVDs.
 A good site to discuss the UMD format is UMD Talk, http://www.umdtalk
.co.uk
.

Sony PSP Strategy

With the PSP, Sony is not just going for the wanna-play-all-the-timegimme-
awesome-graphics gamer. Instead, their focus is on a great gaming
device that can do “everything else” and attracts the young, the teens, the
twenty-somethings, and older audiences. Younger audiences will want the
games and movies, while older audiences, through a brilliant “buy UMD
movies everywhere and play media anywhere” strategy, will buy the unit as a
portable movie player and media device.When the Playstation 3 comes out,
Sony will integrate the media capabilities of the PSP with Playstation 3’s
media center focus and extend the “media anywhere” gaming and media
solution. Coupled with the wireless Internet capabilities, Sony could potentially
deliver home media stored on a Playstation 3 (or other Sony devices)
to the PSP anywhere you can get Wi-Fi access. Pretty cool, huh?


Full Technical Specifications of PSP


Here are the fairly official technical specifications of Sony’s flagship handheld:
 Size: 170 mm (6.7 in) in length, 74 mm (2.9 in) in width, and 23
mm (0.9 in) in depth, weighs 280g / .62 lbs (Source:Wikipedia)
 Processor: 32-bit MIPS “R4000” 4KE or 24KE, dual-core. Primary
core is for standard system functions, including hardware-based data
decryption. Second core, called the “Virtual Mobile Engine,” is for
graphics processing, including native H.264 decoding.
■ Speed: 1-333 MHz (although Sony has made mention to a cap of
222 MHz to conserve battery life)
Programmers can get around the 222 MHz barrier in code.
■ Runs on 0.8 to 1.2 volts
■ Designed using a 90-nanometer process


 Graphics: Runs at 166 MHz, reconfigurable to handle particular processing tasks.
■ 2 megabytes video memory
■ Supports a maximum of 33 million polygons/second, although the effective polygon
performance is likely much lower (many critics don’t like the “max” polygons
rating because it excludes the use of effects like lighting, fog, and so forth)
■ 664 million pixels/second maximum fill rate
■ 512-bit interface
■ Supports 16-bit and 32-bit color modes (32,768 colors and 16.77 million colors)
 Audio: Supports Stereo sound, Dolby Headphone sound. Supports playback of WAV,
ATRAC and MP3 (MPEG-1 Audio Layer 3) audio in Firmware 1.0 and 1.5, and adds
AAC (MPEG-4) audio in Firmware 2.0.
 Display: 4.3" (diagonal) 480 × 272 Widescreen display, 16:9 aspect ratio, just like
widescreen DVDs and HDTV
 RAM: 32MB of RAM. 4MB of DRAM; half (2MB) is connected to the main core, and
the other 2MB is for media processing functions.
 Storage:The PSP has the following storage capabilities:
■ Sony Memory Stick Duo slot takes only Memory Stick Duo media (although
Chapter 3, “Quickies,” covers using standard Memory Stick media, which is usually
cheaper).
■ UMD discs support up to 1.8GBeach and basically any type of data. Official formats
include UMD-Game, UMD-Video, and UMD-Music. This appears to be
based on Sony’s MiniDisc format.
■ USB 2.0 port supports data transfers up to 480 megabits/second.
■ Supports sharing of files on inserted Memory Stick with a USB-capable computer.
 Power: Includes 1800 mAh Lithium Ion (LIon) battery, provides 4–6 hours of battery
life (Sony offers an official 220 mAh battery as well, and third parties such as Datel have
batteries providing 3600 mAh).
■ A/C charger included with package yields 2000 mAh
■ Capable of charging using power provided via a computer’s USB 2.0 port
 Networking: Built-in 802.11b (11 megabits/second max throughput) wireless supports
both ad hoc (computer-to-computer) and infrastructure (device-to-access point) modes.
■ IrDA (Infrared Data Association) line-of-sight communications
■ IR Remote (SIRCS compliant), although no “official” remote control software was
available at the time this book went to press
■ Potential to use USB port for other networking devices, should they ever be
released

 Navigation system: Uses Sony’s XMB, or Cross Media Bar, interface, used in some Sony
TVs and their PSX product. (I call this the “PSP Navigator” in this book.)
 Region coding: Supports region coding of games, music, movies, and photos on UMD
discs, similar to how DVDs do the same thing to prevent media use in other regions of
the world.


Video Capabilities


Everything considered, the PSP’s graphic capabilities are roughly the equivalent of the PS2. But
how can that be? Well, the PSP’s 480 × 272 maximum resolution is quite a bit less than a PS2’s
1280 × 1024, but its rendering capabilities for the 480 × 272 resolution match what the PS2 can
do at 1280 × 1024. So what does this mean to you? It means PS2 games should easily be ported
to the PSP, and the graphics should be similar if not identical.


Battery Life


Compared to other portable gaming systems, the PSP is not only more powerful, it’s also more
power hungry. Indeed, with a 333 MHz processor, ultra-bright widescreen color display, wireless
networking, and an optical UMD drive to run, the battery is working overtime to make
sure you stay entertained for hours on end. Thankfully, Sony has included a rechargeable 1800
mAh Lithium Ion battery to help out—normal alkaline batteries wouldn’t survive the load for
long and would be darn expensive to replace all the time.
On a full charge, you will get (and independent organizations have confirmed this) up to six
hours of battery life when playing video games, and up to four hours for movies. This is assuming
you’re running the screen at half intensity and half volume with wireless off. I tend to run
with the brightness and volume all the way up, so take about 10 percent off that figure if you
play the same way.


Network Capabilities


Excluding games on PDAs and cell phones, the PSP is the only mass-market game system ever
shipped with robust networking capabilities: 802.11b wireless, IrDA, and a Web browser (in
firmware 2.0 and above). The PSP can also update itself over the Internet, making it the first
mass-market handheld product with a network update function, similar to Microsoft’s
Windows Update feature and Apple’s Software Update function.


PSP Firmware Versions and Why They Matter


The PSP has a “flashable” firmware, meaning it can be updated with bug fixes, and upgraded
with new capabilities. This enables Sony to support new technologies as they emerge, address
vulnerabilities in the PSP software (such as Web browser and buffer overrun vulnerabilities),
and keep the product competitive as the market evolves. Unfortunately for us hackers, Sony
removed the ability to program the PSP on our own starting with the 1.51 “update,” which featured
“security updates”—just another way of saying “we don’t want software developers.” Of
course, you don’t have to update to run most games on your 1.0 or 1.5 firmware PSP, and there
are utilities, such as the WAB Version Changer (available from the official Hacking the PSP
Web site) to get around such issues. Chapter 16, “Reverting from a 2.0 PSP to a 1.5 PSP,” discusses
how to downgrade a firmware 2.0 PSP (not 2.01 or higher) back to version 1.5.
If you are not going to program the PSP, the upgrades from Sony can be quite a boon.With
firmware update 2.0, officially named System Software 2.0, Sony added a Web browser,
enhanced wireless network access (supporting additional encryption technologies such as WPA
and PSK), and support for MPEG-4, or AAC, audio files. These new features greatly
enhanced the PSP’s already impressive media capabilities.

My PSP

In the PSP, Sony has engineered a true marvel of technology. Combining amazingly powerful
data and media processing capabilities with a slim, long-life, portable form factor, Sony has literally
started the next generation of media on-the-go. Competitors such as Apple, Creative,
iRiver and many others are sure to latch onto the ability to have any type of media, anywhere
you go. Add into the equation the power of built-in wireless Internet access, and any number of
productivity and media applications, coupled with the high-resolution screen, and the PSP
truly becomes a one-stop device.
Unfortunately, Sony has limited the capabilities of the PSP by letting only humongous game
companies write applications for it, and letting it play only limited (yet omnipresent) music and
media formats with no chance for the grass roots developers, now called “hackers,” to write
powerful applications and build an industry around the PSP. Many companies have done this
before, and hackers have always found a way around it. In this book we’ll make the PSP do a
lot of the stuff we know it can do.


What you need to hack

For the majority of these hacks, any PSP will do. There have been many firmware revisions
(also called “system software” revisions) for the PSP. The first PSP, released only in Japan, was
version 1.0. The U.S. PSP launched with version 1.5. Updates have been released—versions
1.51, 1.52, and 2.0, among others.
The only sections that are truly affected by firmware versions are the programming chapters,
and the ability to run “homebrew” applications that you download from the Internet. There
have been hundreds, if not thousands of homebrew applications released, ranging from simple
console applications to neat games to PDA-like applications to old game system and Linux
emulators.
PSP firmware 1.0 allowed you to run these homebrew applications without any modification. PSP
firmware 1.5 attempted to lock out homebrew applications (apparently, Sony doesn’t want you
running software on your PSP from which they get no royalities). Hackers got around this limitation
with a few “exploits” that let you run the homebrew software on the U.S. PSPs, which
shipped with only firmware 1.5.

With a firmware update feature built into the PSP, Sony quickly released a “System Software
Update” (version 1.51) that was supposed to “increase the security of the PSP operating system.”
This was code for “we’re gonna stop the hackers with this update.” The update appeared
to have foiled anybody’s attempt to launch homebrew applications from then on until some
genius hackers were able to take advantage of an exploit in Sony’s PSP operating system and
downgrade a version 2.0 PSP to version 1.5. Other attempts have been made to re-enable
homebrew applications to run on firmware versions 2.01 and beyond, but as of the writing of
this book that had not been completed successfully.
It’s always a good idea to update your PSP manually instead of using the built-in update feature.
This way, you get to keep the EBOOT.PBP, which is the application that updates your PSP. Should
you need that EBOOT again, you will have access to it—otherwise you can’t “roll back” should
you need to. This is a good practice to get into for any hardware platform you are hacking: only
update when you need to, and always have a backup!
Of course, over one million PSPs have been sold with the 1.5 firmware, so chances are your
PSP came with that version. (You learn how to check your firmware version in Chapter 19,
“Running Homebrew Applications.) You can also find version 1.5 PSPs in stores that sell used
equipment, such as GameStop, EB Games, eBay, and many others. If your PSP came with or
you have upgraded to firmware 2.0, which includes a host of new features as well as an official
Sony Web browser, you can still downgrade that device to 1.5 using the hack in Chapter 16,
“Reverting from a 2.0 PSP to a 1.5 PSP.”
Either way, you can enjoy all of the hacks in this book, except the programming hacks, with
any version of a PSP. Of course, if you want to program the PSP, I recommend getting a version
that can run the hacks, because it’s a lot of fun (then again, I’m a software developer).
Another item you should have handy is a USB cable to connect your PSP to your computer
(these are usually mini-USB to full-size USB cables, available from any computer or electronics
store). The only way to get data on your PSP effectively is through the USB port on the top of
the device. Of course, you could use a Memory Stick reader connected to your computer, but
the USB cable is much, much easier.